Shooting a 3D documentary: demolition POV – ContourHD versus GoPro HD

3D POV, here we come. We’ve started looking into cameras to shoot POV footage for our first 3D documentary.

This content is a must – there’s nothing like being able to put a camera where no human dare go and capture the scene from that angle.

For example, what’s it like to ride on an excavator boom while it’s ripping bleachers apart?

An excavator demolishing bleachers, the RCA Dome

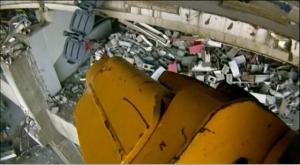
This is a screen grab from the demolition of the RCA Dome in Indianapolis, Indiana, the subject of a previous Blowdown show – the explosive demolition series we’ll be filming in 3D.

Now imagine part of the grapple in negative space.

But it’s going to take a bit to get there.

The cameras we use have to be:

1) Lightweight enough to be mounted onto a Magic Arm, or duct taped/fastened to something on the machine.

2) Placed at an interaxial distance small enough to film an object within 1 ½ metres from the lens.

3) Workable with a customized side-by-side rig (that we’re apparently going to build … of course).

4) Capable of turning on in sync.

Our stereographer, Sean White, has narrowed it down to two contenders: the ContourHD 1080p or the GoPro HD.

Suspect the Contours will reign because they’re less boxy, but the GoPro’s a bit better quality – so I’d like to find a way to use if possible.

We’ll see how the “dare to compare” goes.

Shooting a 3D documentary: anaglyphic test footage – 2 Canon 7Ds on a side-by-side rig

As I’ve mentioned, we’re testing several camera systems out to decide what to use to film our first 3D documentary. We’ve seen promising footage out of our A cam system – an Iconix sensor system with Meuser Optik lenses on a side-by-side rig.

Now our stereographer, Sean White, has brought in B roll he shot with our C cam system: two Canon 7D DSLRs on a side-by-side rig.

Happy to say it’s not looking bad either.

Need a pair of the old school anaglyphic glasses for this one:

There’s only one problem: some of the backgrounds are diverging past our broadcasters’ specs.

So now we’ll have to experiment with different interaxials until we fix the issue.

In the field – the demo of a condemned sports stadium in Salvador, Brazil for the explosive demolition series Blowdown – this system will be used to capture establishing shots of the structure and, of course, its implosion.

Here’s an earlier video of Sean, walking though the setup.

We’re also honing how to capture our time lapses with this system – details to come.

Editing a 3D documentary: how to burn 3D HD footage using Final Cut Pro

Our editor, Brian Mann, has found a way to burn up to 20 minutes of 3D HD footage that will play in a Blu-ray player … without a Blu-ray recorder.

He discovered the work-around after I asked him to compile some test material we’ve shot/composited so I can show it to the broadcasters we’re delivering our first 3D documentary to.

Here’s how:

1) Put a standard-issue DVD into burner.

2) In Final Cut Pro, choose File, then Share.

3) Choose Blue-ray, then Export.

4) Wait for it to finish, and voila. The DVD thinks it’s a Blu Ray disk.

I plan to show the DVD (a montage of 3D footage and 3D VFX) during a meeting with broadcasters so they can see the visual style we’re developing.

Playing the file off of a laptop’s the alternative, but could prove problematic for several reasons:

1)Laptop would have to be powerful enough to play the files.

2)The file could crash or not play back properly.

3)Cumbersome extras – like a DVI to HDMI cable – would be required.

With a DVD, we can set up a JVC 3D HD monitor and a Blu-ray player, then play the DVD knowing it will work.

Sure, it will only burn 20 minutes – but that’s more than enough for my presentation purposes. Easy to play 3D content in a boardroom setting.

Of note: Brian’s encoding side by side so that the footage will display on the monitor properly – no dual stream. Not something we want to forget.

That, and plenty of backup copies.


Video: testing lenses for 3D HD filmmaking – how to tell which ones stack up

The great lens showdown is over: Meuser Optiks it is. After an intense push to 
After an intense push to choose lenses for our A cam system so we can shoot our first 3D documentary, these German lenses – 3.4 mm, designed for a 1/3-inch CCD sensor, and HD capable – were the ones that made the cut.

They work with our Iconix 1/3-inch sensors, and the interaxial distance can be set close enough to allow us to fil  1 ½ -2 metres away from our subject.

The Schneider Cinegon 5.3 mm lense and the Fujinon 4.8 mm HD Prime lens just didn’t work as well for us.

Here’s video of the test screen – our stereographer, Sean White, explains what we’re looking for while we’re watching the test footage on our new JVC 3D HD monitor

Another to follow ASAP on why the system should work to shoot the prep and implosion of a condemned sports stadium in Salvador, Brazil for the explosive demolition series Blowdown – YouTube’s fighting me.

Next!

Shooting a 3D documentary: Film Factory 3D Indie BS Rig mirror issues

So … we’ve broken the backup mirror we purchased for our Film Factory 3D Indie BS Rig to shoot our first 3D documentary.

This wouldn’t be a huge problem if the stock mirror that came with the rig were up to QC par.

But it isn’t – which is why we were using the backup in the first place.

Here’s the issue: one side of the stock mirror is coated and one side isn’t – the coated side is reflected to the camera that’s mounted on the top of the rig.

This disparity seems to cause a difference in light between the two cameras, to the order of one stop (ie. the upper camera gets about half the amount of light as the horizontal camera).

Our stereographer, Sean White, also found that there’s a slight colour difference between the two cameras, and a mild fogginess to the stock mirror.

We plan to use this rig to shoot the implosion of a condemned sports stadium in HD. And we deal with high-profile broadcasters – we have to deliver high-quality footage (for them and, more importantly, for a worldwide audience).

So Sean grabbed the spare – which we bought in case we break the original one while filming on an industrial site in Salvador, Brazil for the explosive demolition series Blowdown – to see if it gave us more consistent picture.

It did – there’s only 1/3 to 2/3 of a stop difference between the two cameras, the colour is almost matching, and it’s fog-free.

Though none of us are sure why this is the case, we moved to film with the superior mirror (ie. the backup became the starter).

But while Sean was re-screwing it into the rig, it cracked.

The placement process is quite a balancing act – screw the mirror in too loosely (or mess up the gaffer tape), and it threatens to slide out the bottom when you position it at 45 degree angle.

Sean thought he had found the sweet spot for tightening, but he was used to adjusting the stock mirror … the backup shattered under a similar amount of tension (which makes us think the first mirror may contain more plastic, but that’s just a theory).

Needless to say the setback is disappointing.

Sean got in touch with 3D Film Factory. They won’t exchange the stock mirror for one that’s like the backup. But they will sell us another backup at a deep discount.

Granted, this rig is cheaper than most of the other ones out there, so we can’t expect the moon.

But considering how integral a working mirror is to the system, hopefully quality discrepancies and the finicky screw-in process will be rectified in the future.

Editing a 3D documentary: working with two audio channels in Cineform Neo3D

Looks like we’ll have to find a workaround for the audio issue we’ve encountered with Cineform Neo3D software in order to edit our first 3D documentary.

As I’ve mentioned, the 3D files that Cineform creates only have two audio tracks.

To capture ambient noise as well as a conversation between two subjects for the explosive demolition show Blowdown, we have to capture at least three channels (a boom mic and two lavs), sometimes four (camera mic).

Our editor, Brian Mann, has been in conversation with Cineform developers to see if we could find a way to edit with more than two channels.

They’ve been very prompt in replying and helpful.

But unfortunately it looks like there’s no way to edit more than two channels of audio using the current version.

There’s no particular reason why the program’s this way – it’s just a design factor that isn’t optimal for our specific post production needs.

As far as we’re concerned it’s the best high-end game in town, and otherwise it’s working great.

Cineform’s lead Mac engineer plans to add it to the list of things to add to their future release, First Light.

In the interim, we’ll have to figure out how to adjust our workflow.

Shooting a 3D documentary: Schneider, Fujinon, Meuser – it’s a lens showdown

We’re on a mission to find a functional lens for our A cam system to shoot our first 3D documentary.

And it’s almost time for the ultimate showdown: pitting three different models against each other, head to head … to head.

As I’ve explained, the winning candidate will ideally work with our Iconix 1/3-inch sensors, capture in HD, and allow us to film  anywhere from 1 ½ -2 metres away from our subject to as far out as we want to go.

Easier said than done.

The Schneider Cinegon 5.3 mm lenses we ordered from New York are meant for a 1/3-inch sensor, but they’re not designed to shoot in HD, so I suspect the quality will be too low.

(more…)

Shooting a 3D documentary: run and gun data management

Shooting our first 3D documentary’s not only going to change the way we capture content in the field, it’s also going to drastically change the way we store it.

Not only will this be the first show that my crew shoots tapeless, they’ll also have to contend with twice the amount of footage.

And if they lose any of it, it could be a huge disaster (think: Blowdown without the implosion. Yikes).

So we’re looking into a system that will allow us to move footage from camera/nano3D compact flash cards to a storage unit during the day, the transfer it into a mega conduit each evening.

Our data journey would start with ShotPut Pro. This copy utility application automatically copies and verifies all transfers off of flash cards. It can also copy multiple cards to multiple hard disks at the same time.

We’d use ShotPut Pro to transfer our footage to a G RAID mini. Using its RAID 1 setting, the crew would put two copies of everything onto the mini’s two SATA drives. This redundancy means that if for some reason we lose one drive, we won’t lose the farm.

Each G RAID mini stores up to 1 TB of data, so we should be able to carry our footage (up to 500 GB, copied twice) on it until the end of the day (if the crew’s shooting more than that amount, they’re shooting too much!).

Each evening, we’d then transfer the footage from the G RAID mini to a G SAFE. Each of these storage units takes up to 2 TB of data, and only stores RAID 1 (mirrored), which means two copies stored no matter what.

The data journey would end when both 7200 RPM SATA II drives are removed and shipped back to the production house separately, in case one gets lost in transit.

Approximate cost: $100 for ShotPut Pro, $300 for the G RAID mini, $700 for the G SAFE with two drives (ie. the first 2 TB of storage).

After that, we’ll be buying drives just like we bought tapes – I’m interested to see how costs compare out the other end.

And another first – to keep track of audio tracks, locations and dates (in lieu of the tape, sticker and marker technique) we’ll be using an electronic slate, courtesy of the iPad.

Editing a 3D documentary: stereo scripts that work with Adobe CS5

Good news on the post front: we’ve upgraded from Adobe CS4 to CS5.

And the stereo scripts our compositor will use to create VFX for our first 3D documentary work with the newer version.

We’ve been gearing to get CS5 running since we moved from Leopard to Snow Leopard to take advantage of the 64-bit architecture and improve workflow.

But our VFX artist, Jakub Kuczynski, was concerned stereo 3D scripts he found online that have given him a much more efficient pipeline for stereoscopic workflow in After Effects wouldn’t transfer over smoothly to CS5.

He contacted the scripts’ developer, Christoph Keller, to ask if they’d be compatible, but he didn’t know.

Now we do. And it’s very good news – work that would take Jakub a day to do manually takes him about an hour, thanks to the scripts.

As for the CS5/Leopard upgrades, we haven’t noticed a marked increase in speed, but even a little more juice over the long run means more efficient post production overall.