Editing a 3D documentary: JVC HD 3D LCD monitor review

Our HD 3D monitor has arrived!

It’s the 46-inch JVC GD-463D10, and it means our editor, Brian Mann, doesn’t have to view footage in anaglyph anymore.

Moving to polarized is a relief – no colour loss, no red and cyan ghosting … and no headaches.

Purchasing the monitor ($6,600 later) was obviously a must – you can’t produce a high quality 3D show, like the first 3D documentary we’re going to shoot, editing in anaglyph.

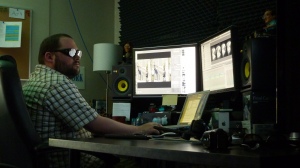
We managed to fit it into an edit suite and set it up. Brian, Jakub and I check out some VFX footage on our newest 3D toy:

When it comes time to cut this Blowdown, Brian will use the monitor to see what he’s editing in Final Cut Pro (which, as I’ve mentioned, can’t edit in 3D without third party program help – we’re trying Cineform Neo3D out).

This view is key – cutting 3D shots means there’s a lot more to consider – parallax, convergence, wide and close, how much positive depth/negative depth exists in each shot.

If you cut shots with huge discrepancies in depth it’s really uncomfortable to watch, so you can’t just chop shots together – even with a flashy transition.

The only rub with the monitor is that it doesn’t do dual stream, which means the footage is technically at half-resolution (ie. don’t get both eyes full res).

So even though we’re editing in dual stream (to deliver the highest quality possible), we can’t view it that way on the JVC screen.

We looked into dual stream monitors – Panasonic’s due to release a 25-inch unit in the fall – but it’s prohibitively expensive (approximately $10,000).

And, more importantly, it’s too small for us to view our footage in a size that’s representative of our final product (how many 25-inch televisions have you seen lately?) – a shortfall that could lead to convergence that isn’t optimal for our audience.

Oh, and the JVC came with two free pairs of polarized glasses.

Looks like we’ll do just fine:

Editor Brian Mann works with the JVC HD 3D LCD monitor

Shooting a 3D documentary: run and gun data management

Shooting our first 3D documentary’s not only going to change the way we capture content in the field, it’s also going to drastically change the way we store it.

Not only will this be the first show that my crew shoots tapeless, they’ll also have to contend with twice the amount of footage.

And if they lose any of it, it could be a huge disaster (think: Blowdown without the implosion. Yikes).

So we’re looking into a system that will allow us to move footage from camera/nano3D compact flash cards to a storage unit during the day, the transfer it into a mega conduit each evening.

Our data journey would start with ShotPut Pro. This copy utility application automatically copies and verifies all transfers off of flash cards. It can also copy multiple cards to multiple hard disks at the same time.

We’d use ShotPut Pro to transfer our footage to a G RAID mini. Using its RAID 1 setting, the crew would put two copies of everything onto the mini’s two SATA drives. This redundancy means that if for some reason we lose one drive, we won’t lose the farm.

Each G RAID mini stores up to 1 TB of data, so we should be able to carry our footage (up to 500 GB, copied twice) on it until the end of the day (if the crew’s shooting more than that amount, they’re shooting too much!).

Each evening, we’d then transfer the footage from the G RAID mini to a G SAFE. Each of these storage units takes up to 2 TB of data, and only stores RAID 1 (mirrored), which means two copies stored no matter what.

The data journey would end when both 7200 RPM SATA II drives are removed and shipped back to the production house separately, in case one gets lost in transit.

Approximate cost: $100 for ShotPut Pro, $300 for the G RAID mini, $700 for the G SAFE with two drives (ie. the first 2 TB of storage).

After that, we’ll be buying drives just like we bought tapes – I’m interested to see how costs compare out the other end.

And another first – to keep track of audio tracks, locations and dates (in lieu of the tape, sticker and marker technique) we’ll be using an electronic slate, courtesy of the iPad.

Editing a 3D documentary: stereo scripts that work with Adobe CS5

Good news on the post front: we’ve upgraded from Adobe CS4 to CS5.

And the stereo scripts our compositor will use to create VFX for our first 3D documentary work with the newer version.

We’ve been gearing to get CS5 running since we moved from Leopard to Snow Leopard to take advantage of the 64-bit architecture and improve workflow.

But our VFX artist, Jakub Kuczynski, was concerned stereo 3D scripts he found online that have given him a much more efficient pipeline for stereoscopic workflow in After Effects wouldn’t transfer over smoothly to CS5.

He contacted the scripts’ developer, Christoph Keller, to ask if they’d be compatible, but he didn’t know.

Now we do. And it’s very good news – work that would take Jakub a day to do manually takes him about an hour, thanks to the scripts.

As for the CS5/Leopard upgrades, we haven’t noticed a marked increase in speed, but even a little more juice over the long run means more efficient post production overall.

Editing a 3D documentary: Cineform 3D software audio challenges

We’ve fed footage from our 3D green screen shoot into post, where we’ve promptly encountered our first editing glitch. We’re running a trial version of Cineform Neo3D software to see if it will work for editing our first 3D documentary.

The reason we’re trying this program is that it allows for dual steam, which means each eye is at full res and in real time, so we can do convergence, colour correction and other editing in real time rather than having to render whenever we make an adjustment.

Cineform also works with Final Cut Pro, the editing software we normally use to cut 2D HD there’s no way to edit 3D in FC without a 3rd party programs, as far as we know.

Great for picture, but there’s a problem with audio.

The 3D files that Cineform creates will only have two audio tracks.

To capture ambient noise as well as a conversation between two subjects, we have to capture at least three channels (a boom mic and two lavs), sometimes four (camera mic).

And since Blowdown – the explosive demolition series we’ll be filming – is event-based, there’s no opportunity for ADR, and you can’t recreate most of the ambient sound in post.

(more…)

3D documentary filmmaking: why Sony EXs aren’t ideal for our beam splitter rig

A week of testing our B cam beam splitter rig system has revealed that the Sony EX1/EX3 duo we’re using with the Film Factory 3D BS Indie Rig aren’t ideal for shooting our first 3D documentary.

The issue isn’t technical – Alister Chapman reports using the same cameras successfully, and we were able to genlock the EX3 to the EX1 by connecting the EX1’s Y channel of the component output to the EX3’s genlock in connector, just as he has.

It’s logistical …the cameras are just too big and cumbersome for this particular beam splitter rig.

We’ve modified the rig so they fit better, but getting them aligned vertically is rough – the mics protrude and we’re still seeing the edge of the box and/or the bottom of the mirror when we use our Sony EX 5.8 mm lens (which has a 56-degree horizontal angle of view).

Wide shots are a must for Blowdown, the explosive demolition documentary we’ll be filming, so we need a system that will effectively capture this kind of footage – ie. we need to hit the sweet spot on the mirror, have the cameras vertically aligned and not see the rig when we use wide-angle lenses.

The alternative is enlarging the image in post to eliminate the part(s) of the shot that contain the rig, but that will degrade the quality, so I want to try and avoid this (especially since we’ll be blowing the footage up it to a certain degree already to facilitate convergence).

So, now we’re working with Canon Canada directly to get loaners of the XF305, which has just been released.

(more…)

Shooting a 3D documentary: review – Film Factory 3D Beam Splitter Indie Rig

Our crew’s spent the last week testing the B cam system we hope to use to shoot our first 3D documentary.

Here’s what we’ve learned about the Film Factory 3D BS Indie Rig:

Pros

1) Relatively affordable: rings in at $3,895 US plus shipping and handling (we also bought an extra mirror in case the first one smashes in the field. Don’t think we’ll find a second lying around at the condemned sports stadium slated for explosive demolition in Salvador, Brazil, where we’re going to be filming, and shipping one in would surely be a nightmare).

2) Robust but adjustable: the rig’s sturdy, so I think it will stand up well in the field. But luckily the structure isn’t rigid – we’ve had some difficulty lining our Sony EX1 and EX3 up properly (see: large and cumbersome … it’s a problem), so we’ve disassembled the rig, manually repositioned parts, and tightened them to try and accommodate the cameras.

Specifically, the aluminum rails are locked in with screws that can be loosened, adjusted, and locked back in. Without this flexibility we’d have no hope of effectively adjusting the heights of the cameras relative to the base rail (which we’re still working on. Argh).

Cons

1) Manual operation: It doesn’t have all the fine, automated controls that the higher-end feature film rigs do. It lacks motorized components, so factors such as interaxial distance and convergence have to be adjusted manually. In feature film production, it’s often one person’s job just to operate the remote to make these adjustments on automated units.

2) Heavy load: This is just something the crew’s going to have to get used to – 3D shooting demands so much more gear. But it’s still a downer. Total tally: the rig, a tripod, two mid-sized cameras, the nano3D recorder, the Transvideo Cineform 3D Monitor, all the sync cables, and battery. We think it may take two extra bodies in the field just to move all of these components around.

And the cameras are a whole other story … more to come on the Sony EX1/EX3 issue.

3D documentary filmmaking: how to sync two Canon Vixias with one remote

As mentioned, I selected implosion cams for our first 3D documentary – six (three pairs) of Canon Vixia HF 10s and 12 (six pairs) of Canon Vixia HF M31s – a little while back.

Next, we needed to figure out how to turn each pair on simultaneously (the duos will be positioned to capture the implosion of a condemned sports stadium in Brazil for the explosive demolition series Blowdown).

And how to turn them on without knocking one (or both) out of alignment.

The cameras need to sit at a 74 mm interaxial distance, right next to each other, for us to capture the footage we need.

This means they’ll be positioned too close together for use to easily access the viewfinder on the right camera, where the camera controls are.

Since each camera comes with a remote, we tried to use them to adjust the settings on each one (holding two, trying to point each one at the infrared sensor on its respective camera), but it’s cumbersome and awkward.

It’s a problem: we need four elements to be in sync between before we start recording for these shots to work: the two cameras have to have the same zoom, the same white balance, the same exposure, and the same focus.

The risk of losing one or more implosion shots – our big bang footage that climaxes the show – because the crew’s running around like mad, trying to calibrate and turn these 18 cameras on properly while preserving their alignment, is a risk I’m not willing to take.

So our stereographer Sean White discovered a work-around – a home-made infrared transmission system that allows us to control both cameras at the same time.

With sourced components off the Internet, a box has been built that will receive any infrared signal and transmit it through a split cable to two infrared sensors.

(more…)

Shooting a 3D documentary: testing the green screen

Green screen action!

Writer Nicole Tomlinson stands in for a 3D green screen test

We’ve taken the Film Factory 3D BS Indie Rig Sony EX1/EX3 B cam setup for a full test run.

The mission: to see if the system can capture green screen footage for our first 3D documentary the way we want it to.

Stereographer Sean White mans the 3D beam splitter rig

We need these shots to create several of out our in-house visual effects, a style we prefer to classic documentary CGI because it allows us to explain extremely technical concepts in a photo-real atmosphere.

This means our transitions in and out of our footage are much more seamless … viewers can stay more immersed in the environment and focused on the story.

Here’s an example of our Blowdown VFX style:

Controlled Demolition Inc. President Mark Loizeaux outlines his demolition plan

The green screen footage we’ll need to include effects like this comes with an entirely different set of issues than the field shots we’ll have to tackle.

This environment is the most “studio” our event-based filming gets – the interviews aren’t scripted, but the lighting is set, the frame is stationary, and there’s opportunity for multiple takes.

But what we capture has to work in our compositor’s virtual environment or it’s completely useless.

Jakub Kuczynski, Parallax Film’s VFX artist, details these challenges:

We’ve thrown the footage over to post – we’ll see if it flies.

Explosive demolition and 3D filmmaking: why Canon Vixia footage survives epic implosions

As we prep to shoot our first 3D documentary, I’ve focused on nailing down our A, B and C cam systems.

Score is zero for three, so far – the A cam requires lenses that may not exist anywhere on earth, we’re still debating which cameras to use for the B cam system (though the Sony EX1/EX3 duo looks promising), and we’ve shot some time lapse stills with the C cam system, but still need to test this duo Canon 5D system for shooting footage.

So I’m embracing our lukewarm successes by adding another mission to the mix:

3D HD implosion cams …18 of them.

Let’s call them our V cam and M cam systems – lettering inspired by the camera brands, this time.

These cameras will capture POV and perimeter shots of the explosive demolition series, Blowdown, piece de resistance – the implosion.

In this case, the lenses will be locked on various points of a sports stadium in Salvador, Brazil, as Controlled Demolition Inc. takes it down with explosives.

As you can imagine, these cameras will take serious a beating – riding the building down, sitting in the centre of the field as the stadium crashes to the earth, etc.

For these POVs, we’re going with six (three pairs) of Canon Vixia HF 10s – the V cam systems.

These little cameras have survived the ultimate Parallax Film Productions 2D challenge – riding the Hoyt S. Vandenberg, now the second-largest artificial reef in the world, some 30 metres from the surface to the ocean floor when the vessel was sunk off the coast of Florida in May 2009.

I’ve thrown in a few screen grabs of the ride – watch the full episode trailer here.

A POV camera rides the Hoyt S. Vandenberg as it sinks off the coast of Florida

Six Vixia 10s in our custom-built underwater housings went down – six solid-state, high-capacity SDHD cards survived, and we recovered all of the footage.

Because this system is flash-based, its memory is relatively robust.

For our intents and purposes, this means they have a better chance of surviving massive vibrations and debris that come with the massive implosions we cover. No tape heads to fall off, no moving mechanical parts to malfunction.

Water engulfs a POV camera as the Hoyt S. Vandenberg sinks off the coast of Florida.

These three pairs will be mounted on small rails with a 74 mm interaxial distance.

Our M cam systems will also be placed at strategic places throughout the implosion perimeter to capture key demolition engineering story points (and, of course, rocking, gratuitous destruction).

For this, we’ll need 12 (six pairs) of Canon Vixia HF M31s.

And so the great camera recruitment continues … Double trouble, to be sure.

Shooting a 3D documentary: Sony EX1’s genlock issue and how to get around it

I’ve turned to the Sony EX line to shoot B cam for our first 3D documentary, after we discovered that the two Canon 7Ds we planned to use can’t send an HDSDI signal to our Transvideo Cineform 3D Monitor.

Two Sony EX3s seem to be an intuitive choice, since this model has genlock in capability.

But we’re shooting an event-based explosive documentary series, Blowdown, in a derelict sports stadium in Salvador, Brazil, so having our gear as light and portable as possible is top priority.

Our stereographer, Sean White, hit the blogosphere to see if there was any way to lighten the load. He found a lead on DoP Alister Chapman’s blog.

It looks like we can pair one Sony EX3 with a Sony EX1: the EX1 lacks a genlock in, but according to Chapman only one of the cameras needs to have it … we can send signal from the EX1 into the EX3 and then send both to the monitor.

(more…)