Shooting a 3D documentary: anaglyphic test footage – 2 Canon 7Ds on a side-by-side rig

As I’ve mentioned, we’re testing several camera systems out to decide what to use to film our first 3D documentary. We’ve seen promising footage out of our A cam system – an Iconix sensor system with Meuser Optik lenses on a side-by-side rig.

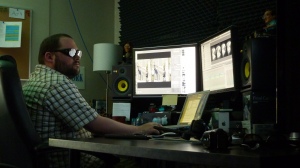
Now our stereographer, Sean White, has brought in B roll he shot with our C cam system: two Canon 7D DSLRs on a side-by-side rig.

Happy to say it’s not looking bad either.

Need a pair of the old school anaglyphic glasses for this one:

There’s only one problem: some of the backgrounds are diverging past our broadcasters’ specs.

So now we’ll have to experiment with different interaxials until we fix the issue.

In the field – the demo of a condemned sports stadium in Salvador, Brazil for the explosive demolition series Blowdown – this system will be used to capture establishing shots of the structure and, of course, its implosion.

Here’s an earlier video of Sean, walking though the setup.

We’re also honing how to capture our time lapses with this system – details to come.

Editing a 3D documentary: how to burn 3D HD footage using Final Cut Pro

Our editor, Brian Mann, has found a way to burn up to 20 minutes of 3D HD footage that will play in a Blu-ray player … without a Blu-ray recorder.

He discovered the work-around after I asked him to compile some test material we’ve shot/composited so I can show it to the broadcasters we’re delivering our first 3D documentary to.

Here’s how:

1) Put a standard-issue DVD into burner.

2) In Final Cut Pro, choose File, then Share.

3) Choose Blue-ray, then Export.

4) Wait for it to finish, and voila. The DVD thinks it’s a Blu Ray disk.

I plan to show the DVD (a montage of 3D footage and 3D VFX) during a meeting with broadcasters so they can see the visual style we’re developing.

Playing the file off of a laptop’s the alternative, but could prove problematic for several reasons:

1)Laptop would have to be powerful enough to play the files.

2)The file could crash or not play back properly.

3)Cumbersome extras – like a DVI to HDMI cable – would be required.

With a DVD, we can set up a JVC 3D HD monitor and a Blu-ray player, then play the DVD knowing it will work.

Sure, it will only burn 20 minutes – but that’s more than enough for my presentation purposes. Easy to play 3D content in a boardroom setting.

Of note: Brian’s encoding side by side so that the footage will display on the monitor properly – no dual stream. Not something we want to forget.

That, and plenty of backup copies.


Video: testing lenses for 3D HD filmmaking – how to tell which ones stack up

The great lens showdown is over: Meuser Optiks it is. After an intense push to 
After an intense push to choose lenses for our A cam system so we can shoot our first 3D documentary, these German lenses – 3.4 mm, designed for a 1/3-inch CCD sensor, and HD capable – were the ones that made the cut.

They work with our Iconix 1/3-inch sensors, and the interaxial distance can be set close enough to allow us to fil  1 ½ -2 metres away from our subject.

The Schneider Cinegon 5.3 mm lense and the Fujinon 4.8 mm HD Prime lens just didn’t work as well for us.

Here’s video of the test screen – our stereographer, Sean White, explains what we’re looking for while we’re watching the test footage on our new JVC 3D HD monitor

Another to follow ASAP on why the system should work to shoot the prep and implosion of a condemned sports stadium in Salvador, Brazil for the explosive demolition series Blowdown – YouTube’s fighting me.

Next!

Editing a 3D documentary: working with two audio channels in Cineform Neo3D

Looks like we’ll have to find a workaround for the audio issue we’ve encountered with Cineform Neo3D software in order to edit our first 3D documentary.

As I’ve mentioned, the 3D files that Cineform creates only have two audio tracks.

To capture ambient noise as well as a conversation between two subjects for the explosive demolition show Blowdown, we have to capture at least three channels (a boom mic and two lavs), sometimes four (camera mic).

Our editor, Brian Mann, has been in conversation with Cineform developers to see if we could find a way to edit with more than two channels.

They’ve been very prompt in replying and helpful.

But unfortunately it looks like there’s no way to edit more than two channels of audio using the current version.

There’s no particular reason why the program’s this way – it’s just a design factor that isn’t optimal for our specific post production needs.

As far as we’re concerned it’s the best high-end game in town, and otherwise it’s working great.

Cineform’s lead Mac engineer plans to add it to the list of things to add to their future release, First Light.

In the interim, we’ll have to figure out how to adjust our workflow.

Editing a 3D documentary: JVC HD 3D LCD monitor review

Our HD 3D monitor has arrived!

It’s the 46-inch JVC GD-463D10, and it means our editor, Brian Mann, doesn’t have to view footage in anaglyph anymore.

Moving to polarized is a relief – no colour loss, no red and cyan ghosting … and no headaches.

Purchasing the monitor ($6,600 later) was obviously a must – you can’t produce a high quality 3D show, like the first 3D documentary we’re going to shoot, editing in anaglyph.

We managed to fit it into an edit suite and set it up. Brian, Jakub and I check out some VFX footage on our newest 3D toy:

When it comes time to cut this Blowdown, Brian will use the monitor to see what he’s editing in Final Cut Pro (which, as I’ve mentioned, can’t edit in 3D without third party program help – we’re trying Cineform Neo3D out).

This view is key – cutting 3D shots means there’s a lot more to consider – parallax, convergence, wide and close, how much positive depth/negative depth exists in each shot.

If you cut shots with huge discrepancies in depth it’s really uncomfortable to watch, so you can’t just chop shots together – even with a flashy transition.

The only rub with the monitor is that it doesn’t do dual stream, which means the footage is technically at half-resolution (ie. don’t get both eyes full res).

So even though we’re editing in dual stream (to deliver the highest quality possible), we can’t view it that way on the JVC screen.

We looked into dual stream monitors – Panasonic’s due to release a 25-inch unit in the fall – but it’s prohibitively expensive (approximately $10,000).

And, more importantly, it’s too small for us to view our footage in a size that’s representative of our final product (how many 25-inch televisions have you seen lately?) – a shortfall that could lead to convergence that isn’t optimal for our audience.

Oh, and the JVC came with two free pairs of polarized glasses.

Looks like we’ll do just fine:

Editor Brian Mann works with the JVC HD 3D LCD monitor

Editing a 3D documentary: Cineform 3D software audio challenges

We’ve fed footage from our 3D green screen shoot into post, where we’ve promptly encountered our first editing glitch. We’re running a trial version of Cineform Neo3D software to see if it will work for editing our first 3D documentary.

The reason we’re trying this program is that it allows for dual steam, which means each eye is at full res and in real time, so we can do convergence, colour correction and other editing in real time rather than having to render whenever we make an adjustment.

Cineform also works with Final Cut Pro, the editing software we normally use to cut 2D HD there’s no way to edit 3D in FC without a 3rd party programs, as far as we know.

Great for picture, but there’s a problem with audio.

The 3D files that Cineform creates will only have two audio tracks.

To capture ambient noise as well as a conversation between two subjects, we have to capture at least three channels (a boom mic and two lavs), sometimes four (camera mic).

And since Blowdown – the explosive demolition series we’ll be filming – is event-based, there’s no opportunity for ADR, and you can’t recreate most of the ambient sound in post.

(more…)