Behind the Magical Moments: Capturing Bahama Blue

IMG_0698-1024x768

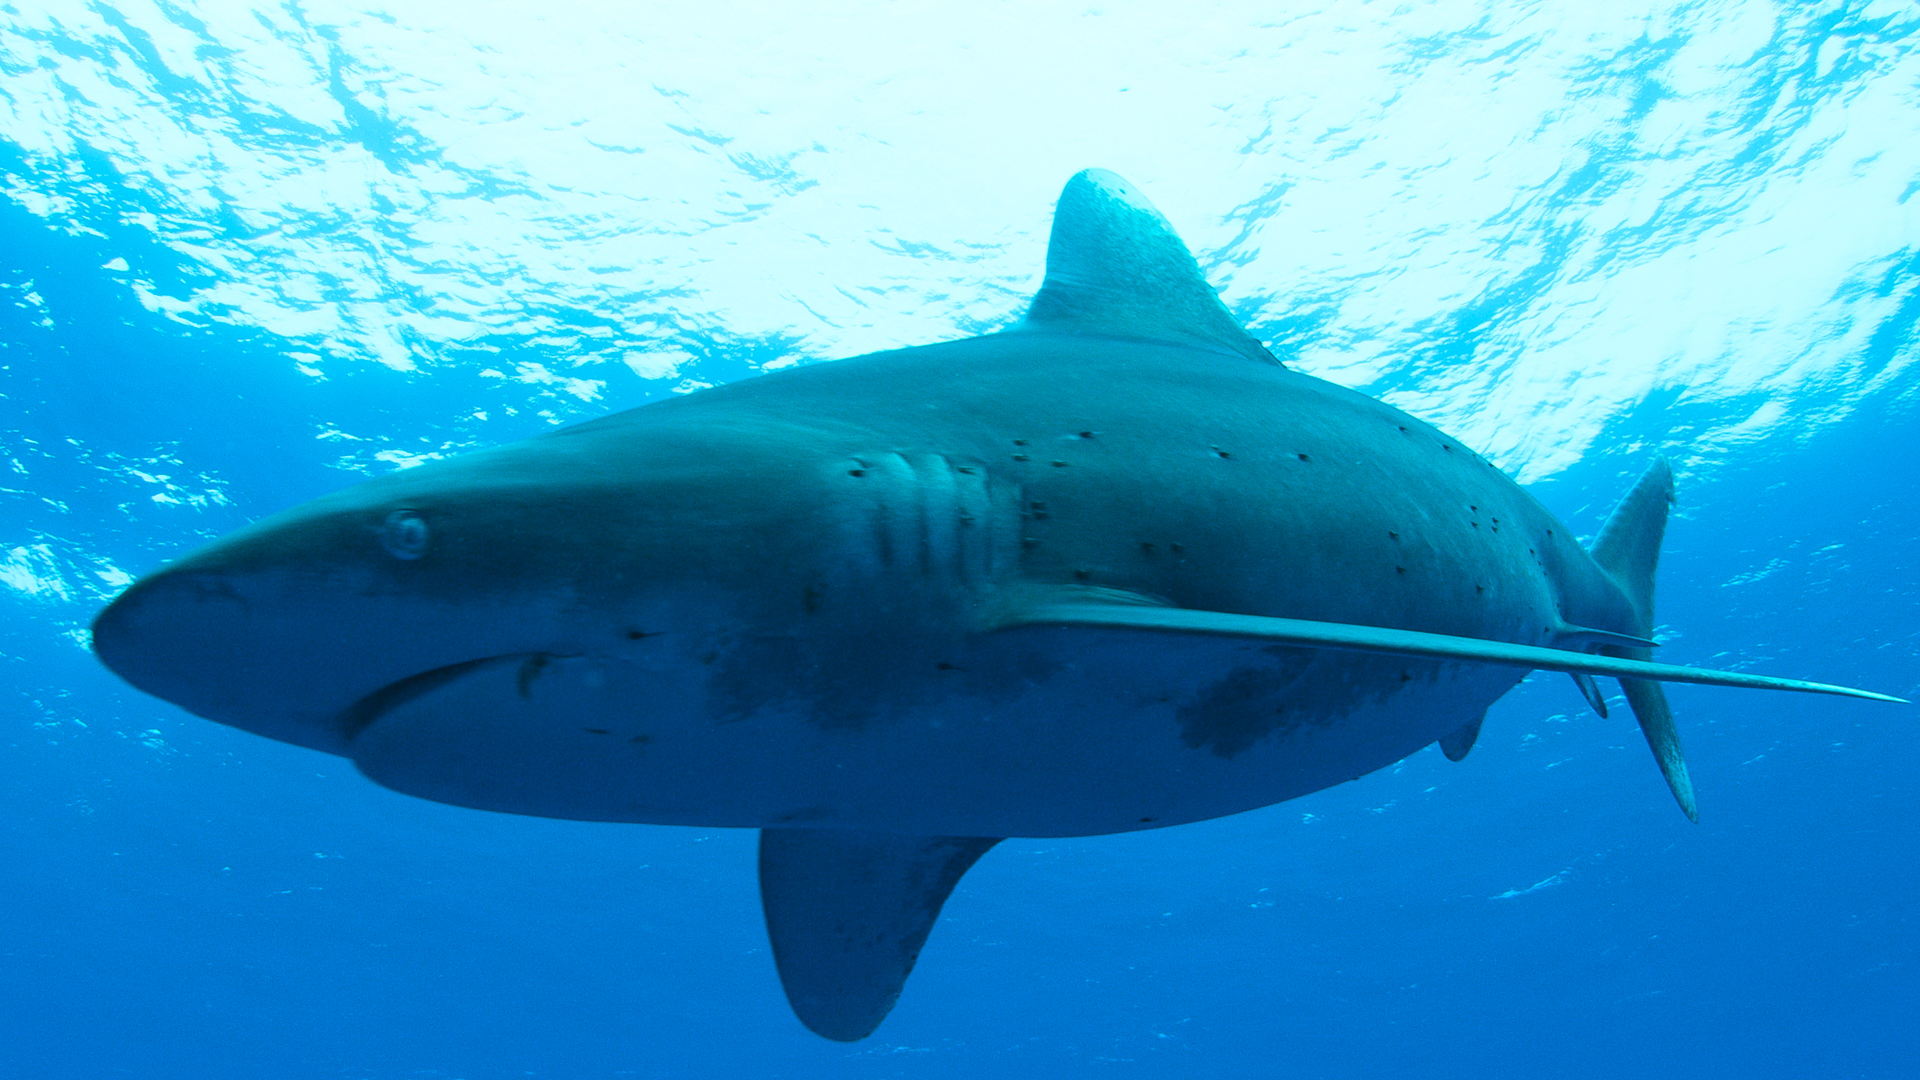
For most people the word Bahamas conjures up images of white sand beaches, rum drinks and great sunsets.  But for documentary director Ian Herring, his perspective changed when he visited in 1996 to film lemon sharks.  “We were standing in a Mangrove swamp,” he explains. “There were full-grown sharks over two meters long in this really shallow water.  It was such a contradiction to see them in this way.  I think coming back, to film again, was to reconcile what I thought I knew with what I witnessed.”

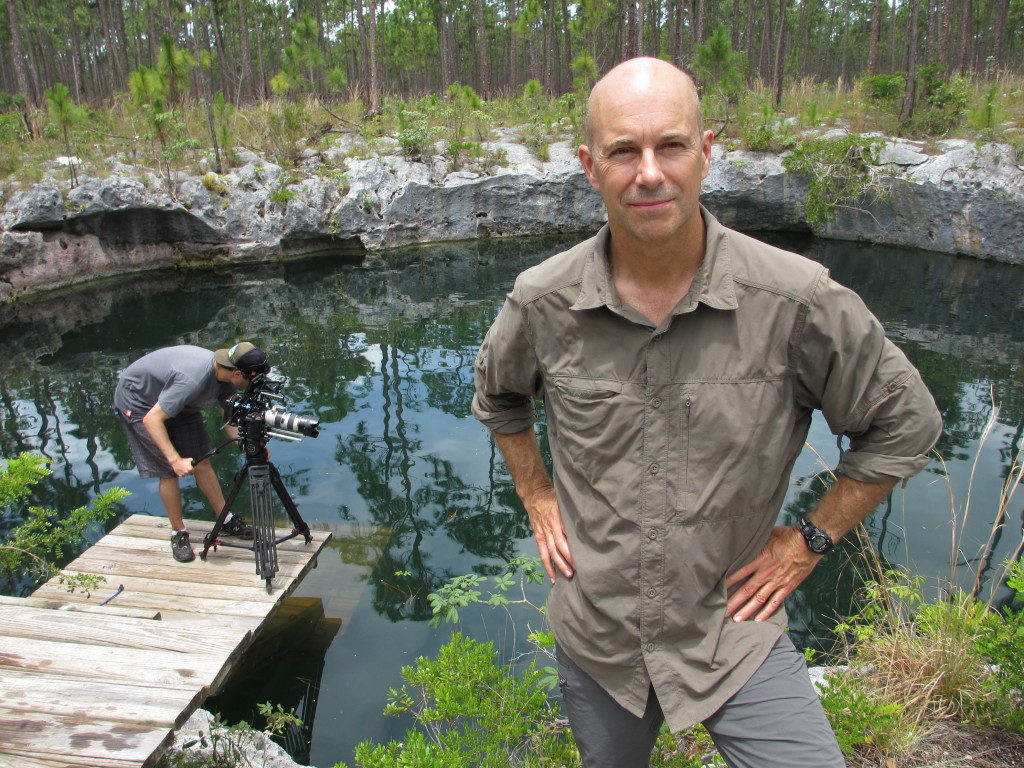
Bahama Blue is a six-part series captured in Ultra High Definition cinematography exploring the diverse ecosystems that are stretched across the chain of limestone islands we know as the Bahamas.  In classical documentary form, Bahama Blue focuses on important actors:  the creatures themselves.  With patience, the team was able to locate and film these animals in their natural habitat.  “Our idea is shift away from the humans and just let the animals and their behaviours reveal the story in a fresh and entertaining way,” says Herring.  “The pressure was on award-winning cinematographers like director of photography Sean White, and underwater camera operators Andy Brandy Casagrande IV and Mark Rackley.  Filming a natural history series like this means managing the three W’s:  Weather, wildlife and water.  It’s never routine.”

This also meant finding a balance with arguably the most famous occupants of the Bahamas: their sharks.  “I understand the obsession,” says Herring.  “Having been in the water with them, you really get a sense of their power and how perfectly adapted they are to the ocean environment.”  With at least forty different types of sharks, the Bahamas has become a world leader in their protection, having fully banned the shark trade in 2011.  “What we learned is that when you protect apex predators like sharks, it benefits the whole ecosystem,” he adds.  “So to focus on the other creatures within this environment was also very attractive to me.”

Bahama Blue (c) 2014 Parallax Film Productions Inc.

How does a filmmaker from Canada navigate such a mysterious and diverse place like the Bahamas?

“The best way is through the researchers and scientists.  They are an amazing network of people who have a specialized knowledge of the Bahamas.  It’s not a large community – everybody knows each other and the research that is going on.  Once you get connected to this network, you discover things you never knew existed.  And someone can tell you exactly where to find them or offer to take you there,” recalls Herring.

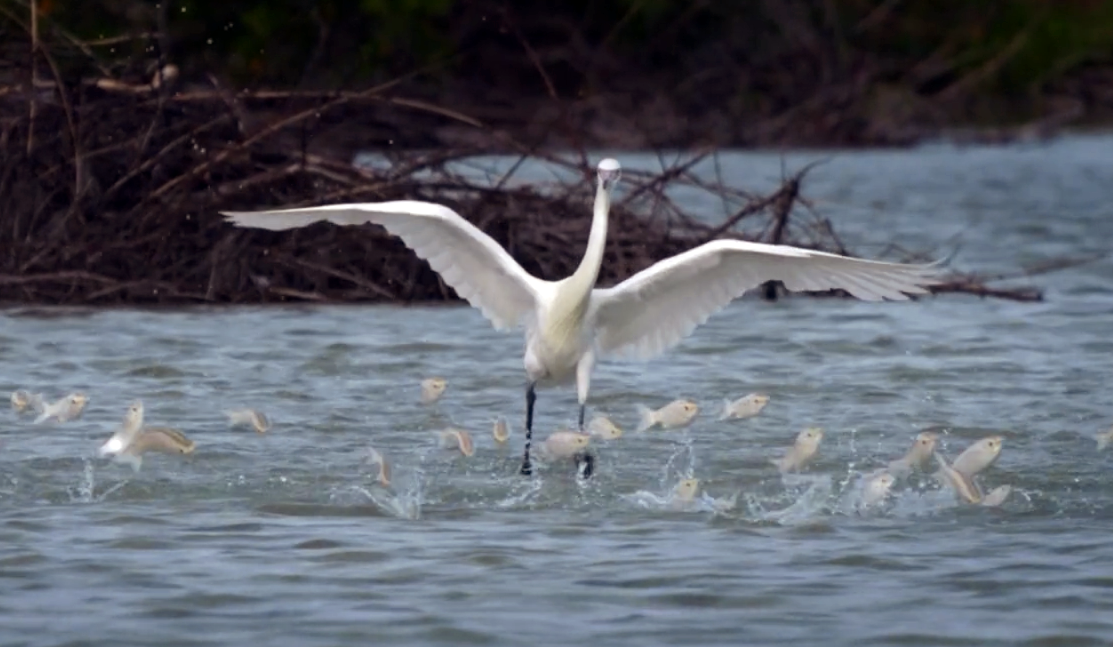
This technique resulted in some lucky finds.  “Birds, for example, are hard to film,” he explains.  “They are creatures of the sky and we are creatures of the land.  But coming back from a day of shooting iguanas with wildlife biologist Joe Wasilewski, he pointed out a solitary bird stalking the tidal flats:  the Reddish Egret, a rare white phase type that stands a meter tall.  “My initial reaction to this was a pretty bird standing on the beach, not much more than that,” remembers Herring.  “But Joe pointed out that the egret had a particular way of feeding.  This shy bird would herd the fish in the shallows and get them corralled in a group, then strike and take out a fish.  It sounded amazing, but it seemed really unlikely that it would do so while we were watching.”

“Our director of photography Sean White was filming juvenile lemon sharks from the beach and they had finally arrived.  He said if we want to film the egret we would have to relocate.  It was a classic filmmaker’s dilemma:  a shark in the hand or a bird in the bush, so to speak. My initial response was, ‘No! Don’t move because this bird will never do what you want in front of the camera.’  Within half a minute of me saying this, it suddenly started its hunting behaviour.  Sean made a quick switch and managed to capture its spectacular leaps and corralling.  It was running through the shallows opening its wings, flapping them and herding this group of fish until they were literally bursting out of the water.  It was fantastic! This was a magical moment in the world of documentary filmmaking that required skill but also came down to listening to the local experts and a bit of luck.”

egret1

In addition to the wildlife, the geography of the Bahamas also provided amazing opportunities for filming.  The Bahamian caves and blue holes are unknown to most travellers to the Bahamas because only certified cave divers are able to access these subterranean features.  On one hand they are easier to film because they are not going anywhere, unlike creatures who may or may not show up.  But on the other hand, you must bring everything you need to survive with you, including air and light to see and film by.

“So the technical challenges make it quite dangerous to film.  But we are not focusing on that in the program, the human danger, ” explains Herring. “We purposefully focus on the geology and special nature of these formations.”

With spectacular imagery, Bahama Blue is both entertaining and educational, drawing the viewer into the lives of elusive creatures, yet highlighting the fragility of the ocean environment.  In a market dominated by character-based television programming, Herring believes that there is still an appetite for natural history programming.  “There is room in our lives for us to be inspired and filled with wonder.  There really is a value to that.”

Bahama Blue was produced by award-winning Canadian producers Ian Herring and Maija Leivo of Parallax Film Productions.

Bahama Blue premieres in Canada on Wednesday May 6, 2015 on the Love Nature channel.

Check out our Facebook page and Tweet us @BahamaBlueTV.

So You Want To Learn 3D? How to bring the stereoscopic dream to life

It’s been a long journey into the realm of 3D documentary filmmaking for myself and the rest of the Parallax team.

A rugged path marked with a few big wins – triumphs earned via epic missions through a series of formidable stereoscopic obstacles.

The good news: we’ve trampled a rough trail … a trail that will hopefully help other enthusiasts avoid getting too thoroughly lost in the enchanted forest that is 3D production.

Our stereographer, Sean White, details some quick and dirty ways to follow us into the third dimension.

Immerse yourself

Learning 3D is a full-time job. A solid foundation of stereo principles is needed if you want to succeed

Research. Take an introductory course. Enlist the help of an experienced stereographer.

Or for true 3D keeners, deconstruct a ready-made system into its basic components. Best way to master the beast. Hands down.

Start small

Our first foray into 3D filmmaking was a modest one involving two $20 cameras purchased on EBay and mounted on a side-by-side rig.

Starting small makes getting bigger the only option.

Experiment

Always think of ways to make your 3D system better. Tinker, take risks, and invent.

Capitalize fully on your mistakes by knowing exactly where you went wrong. Leave no error unturned.

Share your failures and successes with other experimenters. Best way to avoid epic catastrophes.

Keep your eye on the prize

Driving your whole 3D pursuit is the desire for results – not only should you want something properly stereographed but something beautifully stereographed.

Keeping this in mind, never forget to reverse calculate . . . knowing what you want in the end means taking purposeful, well-thought steps to get there.

Alright, that about does it … now it’s time for the good stuff:

Get out there, get dirty, and above all, have fun.

Ian Herring, President

@ianherring

File 177

Stereographer Sean White films Battle Castle: Dover.

Click here for more photos of the Beamer EX and Parallax crew in action.

3D Technology: Parallax Film’s Beamer EX – a stereoscopic rig like none other.

After many blog posts chronicling its inception, the time has finally come to detail la mini beam splitter rig de resistance.

Meet Beamer EX Stereoscopic Rig, a Parallax Film Productions exclusive, designed and assembled by our stereographer Sean White.

File 174

With two successful 3D shoots in the can, our Beamer has proven a force to be reckoned with in the field – portable, rugged, and a damn good shooter.

And pretty easy on the eyes, don’t you think?

Here’s the Beamer breakdown:

– Custom built aluminum beam splitter chassis integrated with 15mm rods and components

– Designed for two Sony EX3 cameras for perfect genlock and time code sync

– HDSDI signals from both cameras recorded to Convergent Designs nanoFlash 3D at up to 280 mbps

– Precise monitoring and alignment with 6″ Transvideo CineMonitorHD 3D View

– Easy to setup and transport

– Switches from tripod to handheld shooting and back in seconds

– Adjustable interaxial distance from 0-100mm

– Calibrated camera heights from base mounts

– Floating 4-point micro adjustment screws for perfect mirror alignment

– Single Anton Bauer Dionic battery on Goldmount powers the monitor and both nanoFlashes

Ian Herring, President

@ianherring

Shooting a 3D Documentary: Sony EX3s on Custom Designed Rig Get The Job Done

Production of Battle Castle is fast underway. It’s a documentary series that brings the world’s greatest medieval strongholds to life and we’ve kicked it off shooting 3D in Kent England, on the grounds of the magnificent Dover Castle.

Packing wisdom gathered from taking Blowdown 3D from production through post, we’ve optimized our beam-splitter rig for this new terrain to avoid the issues (and limitations) we had to work with during our first journey into the third dimension.

The result: one self-contained system that can capture almost everything we need.

Here’s the breakdown:

We’ve chosen to mount 2 Sony EX3s over the Canon 7Ds to avoid genlock issues we were experiencing with the Canons.

The EX3s are great, gold standard cameras and can output a clean signal straight to our Nano3D drives.

We’ve also reconfigured the sliders for more interaxial play and attached customized attachments so we can vertically hang cameras without ripping out the hot shoe mount.

We used red-rock micro components along with some custom parts to fine-tune the hand-held splitter.

Altogether it weighs 45 lbs meaning a strong DoP can hold it for 4-5 minutes before taking a break.

Well worth the effort when it means you have freedom.

Limitation worth noting – the EX3s can’t capture vista shots where the subject is faraway. We fill this gap by using a pair of Canon 5Ds on a side-by-side rig to capture these types of shots.

So what it comes down to is we now have a system with perfect sync, beautiful capture, flexibility, and portability.

What more could you ask for?

Ian Herring, President

@ianherring

Shooting a 3D Documentary: Arming our B-cam system for Blowdown

In the previous post I described the evolution of our mini beam splitter rig, engineered by the Parallax crew for portability and 3D close-ups.

Before the filming of our first documentary, Blowdown, we went back-and-forth on what cameras to mount on this custom-designed rig to complete our B cam system. It was an epic battle that ended with Canon 7Ds as victor … for this round at least.

Here’s why:

When we shot the demolition of the Fonte Nova Stadium, our Iconix A cam system rigged side-by-side, also with our very own hand-held design, took some beautiful shots.

For our B cam system, it down to Sony EX3s or Canon 7D’s. The big problem is the Sony EX3s proved too heavy and cumbersome for our purposes. This is an event-based documentary in a demolition zone – last thing we need is to haul excess weight around.

So the 7Ds were the cameras that we went with – but we knew this decision came with a couple drawbacks:

1. The 7Ds have genlock issues making it difficult to synchronize the captures between the two cameras. Meaning we’re going to have a long gop compression issue.

Translation: fast motion close to the camera will produce retinal rivalry.

2. We can’t use video feeds coming out of the cameras with our Transvideo 3D monitor.

Which means we won’t be able to overlap images and check alignment during the shoot.

3. There’s no uncompressed signal coming out that we can tap into and record to the nano3D drives – a problem in 2D as well.

Despite these limitations, we still captured great stereo images with properly set interaxials.

In the end, our confidence in our Canon 7D mini beam splitter system paid off and we have a visually-unprecedented documentary to show for it.

But as we move further into the third dimension, we’re upping our game …

Ian Herring, President

@ianherring

Shooting a 3D Documentary: How to customize your 3D gear to get the best shot

Industriousness, adaptability, and innovation are vital when it comes to the world of filmmaking – especially when you’re shooting one of the first event-based 3D documentaries ever produced for an international audience.

Before we filmed Blowdown 3D, our stereographer, Sean White, faced a huge challenge: engineer a 3D rig that could capture the variety of shots we needed and stand up to run-and-gun filmmaking on an industrial demolition site.

We decided on a beam-spitter rig because a side-by-side rig wouldn’t have allowed us to shoot the close-ups we wanted.

But there was a problem: the Film Factory Indie beam splitter rig we had purchased would have been a beast to lug around a condemned sports stadium in Salvador, Brazil.

Necessity is the mother of invention after all … if we were going to make this journey into the third dimension work, it was clear that we’d have to come up with our own rigging system.

First step: tear open our Indie Film Factory beam splitter, get to know its insides, and build it stronger.

It was a process of experimentation, ordering parts, making adjustments and modifications.

Customize, customize, customize.

Finally, we created a design that worked and hired a machinist to solder the pieces together.

The result: an aluminum box with a window for a horizontal camera and an underslung design shooting up at a mirror.

We call it the mini beam splitter rig.

Besides being close-up capable, this custom design also makes for less problems with reflection and helps protect the mirror and camera lenses from the rain, dust, etc. sometimes encountered in the field.

Above all else is its portability, which is paramount when you’re filming an event-based documentary.

All this at a fraction of what manufacturers are asking for this kind of optimized technology.

Ian Herring, President

@ianherring

Shooting a 3D documentary: positioning implosion cams around the Fonte Nova Stadium

The explosive climax of our first 3D documentary productionthe implosion of the Fonte Nova Stadium in Salvador, Brazil – is just days away.

Close to 20 camera systems will capture this high-profile event in stereo for the explosive demolition series Blowdown when Controlled Demolition Inc. pushes the button on August 29.

The production crew’s challenge: scope out the best places to put these cameras.

Ian Herring and the rest of the team have already nailed down locations for most of the kill cams. These systems will be placed inside the stadium, destined to be annihilated by the implosion as they capture the event ultra close.

Next, they have to decide where to position our perimeter cams.

So they hit the neighbourhood to scout out the best spots.

Stereographer Sean White explores a piece of Salvador …

… and checks out a tentative camera position

The crew also snapped some VFX plate shots of the stadium while they were offsite.

Our compositor, Jakub Kuczynski, will use these stills to create a 3D model of the structure.

This stereoscopic photo-real stadium will stand long after the real venue falls: we’ll use it in the show to orient the audience, share implosion scenarios, reveal explosive demolition details, etc.

T-3 days.

Nicole Tomlinson

Making a 3D documentary: stunning visuals, solid story

It’s the final countdown. Our stereographer, Sean White, is hustling to nail down all the gear to shoot  our first 3D documentary.

The crew will be packing up on Sunday, and flying to Salvador, Brazil on Monday to start filming the explosive demolition series Blowdown – plan to get get lots of pics and video of the gear before they leave and post here next week.

I’ll be joining them the week after, and will stay until after the implosion of the condemned Fonte Nova Stadium.

And while Sean and the others are busy thinking about how to capture great visuals in 3D, I’m going to be thinking about story.

Even though all this 3D stuff looks incredible, I still believe that if the story isn’t good, it’s not worth watching – so I need to make sure we’re investing in it first.

This means capturing key bits between Controlled Demolition Inc.’s crew – obstacles they encounter, conversations they have, and emotional moments that resonate.

On the other hand, I don’t want to be afraid to capture 3D footage that will captivate our audience visually …

Shooting a 3D documentary: thinking 3D in the field

As our first 3D documentary shoot approaches, I’m contemplating the intricacies of shooting in the third dimension. Our stereographer, Sean White, is familiarizing the rest of the crew with the new things they’ll have to take into consideration when shooting the prep and implosion of the Fonte Nova Stadium in Salvador, Brazil.

Bottom line: the jump into 3D will change how we frame and shoot the explosive demolition series Blowdown.

In other words, it will change pretty much everything.

And to make it work, the crew’s going to have to learn how to “see” in 3D.

They’ll have to think about where things are going to fall into positive and negative space.

They’ll have to identify visuals that are going to look superb in 3D – and, just as importantly, recognize the shots that won’t make the cut.

They’ll have to understand the strengths and limitations of each rig – our beam splitter, mini beam splitter, and the plethora of side by sides – so they know which one works best for which shot.

They need to recognize when we can’t get too close to a subject.

They must realize that they can’t frame something in the extreme foreground and pan to reveal a subject in the background – a trademark move to help create depth in a 2D image can mean too much volume in 3D.

They also need to make sure there are no objects floating around in the foreground (ie. wires, the edge of a wall, rebar sticking up, edge of a concrete slab) – and understand what details could be distracting.

Not to mention they’ll be working on a dusty demolition site – for example, excavators pulling up dirt, swinging into the shot as the “claw” grabs something.

They’ll not only have to think about how this will play in 3D, they’ll have to think about if one lens is dusted out, say, by the excavator’s load.

If they miss any one of the parameters on any one of the eyes this shot – or any other shot – will be useless.

Here’s to cleaning the cameras – times two.  And all the adventure that comes with it.

Lucky we have a great crew. Ready to roll.

Shooting a 3D documentary: how we’re syncing Canon 7Ds (VIDEO)

Yesterday’s post has created some confusion between syncing Canon 7Ds for 3D time lapse photography and syncing them for 3D videography.

I’ve edited to make clear yesterday’s post is for stills, and am now posting re. video.

To sync Canon 7Ds while shooting film footage for our first 3D documentary we plan to use the same infrared box systems we’ve rigged to sync our Canon Vixias, and slate our shots so we can sync in post.

I’ve outlined this technique in previous post for Vixias. For 7Ds we:

Set both cameras to self-time/infrared mode, which allows us to use an infrared remote (The Canon RC-5, in this case)

Position our box designed to receive any infrared signal and transmit it through a split cable to two infrared sensors.

Tape the infrared heads at the ends of the split cable to the infrared sensors on the two Canons and then use the remote to start them in sync.

And yes, because of the internal clock circuitry disparities we don’t get a 100 per cent accurate start and stop, as the cameras may not start recording on the same frame.

Our stereographer, Sean White, has found our 7Ds can be out of sync by one or two frames at 30 FPS.

To get around this we’re doing a physical slate at the start of each shot for our editor – this way he can toggle shots by a frame or two and sync from where the slate is.

Sean’s tested this system extensively.

He’s found that once you sync clips at the start they stay in sync for up to 12 minutes straight – much more time than we need to get the types of shots we’re going to capture with the 7Ds.


Test footage:


VIDEO