Shooting a 3D documentary: how we’re syncing Canon 7Ds (STILLS)

I’ve received a few questions re. how we’re syncing Canon 7Ds we’re using to capture elements of our first 3D documentary … so I’m blogging about it to share with everyone.

We’ve used DSLRs to get high res stills at set intervals for time lapses for years, but, of course, never in 3D.

For this 3D episode of Blowdown, the explosive demolition series we produce, the crew will use 7Ds for these time lapses – and also for establishing shots of the condemned sports stadium in Salvador, Brazil and, of course, the implosion itself.

Here’s how we’ve brought this system into the third dimension:

1) Splice cable so there are two heads on one intervalometer.

2) Attach heads to timer remote ports on two Canon 7Ds on side-by-side rig.

3) Sync using the one handheld intervalometer.

Voila!

I’ll provide more details re. our time lapse strategy later: wanted to get this bit up ASAP.

Hope it helps.


Shooting a 3D documentary: demolition POV – ContourHD versus GoPro HD

3D POV, here we come. We’ve started looking into cameras to shoot POV footage for our first 3D documentary.

This content is a must – there’s nothing like being able to put a camera where no human dare go and capture the scene from that angle.

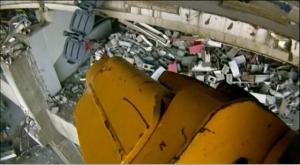
For example, what’s it like to ride on an excavator boom while it’s ripping bleachers apart?

An excavator demolishing bleachers, the RCA Dome

This is a screen grab from the demolition of the RCA Dome in Indianapolis, Indiana, the subject of a previous Blowdown show – the explosive demolition series we’ll be filming in 3D.

Now imagine part of the grapple in negative space.

But it’s going to take a bit to get there.

The cameras we use have to be:

1) Lightweight enough to be mounted onto a Magic Arm, or duct taped/fastened to something on the machine.

2) Placed at an interaxial distance small enough to film an object within 1 ½ metres from the lens.

3) Workable with a customized side-by-side rig (that we’re apparently going to build … of course).

4) Capable of turning on in sync.

Our stereographer, Sean White, has narrowed it down to two contenders: the ContourHD 1080p or the GoPro HD.

Suspect the Contours will reign because they’re less boxy, but the GoPro’s a bit better quality – so I’d like to find a way to use if possible.

We’ll see how the “dare to compare” goes.

Shooting a 3D documentary: anaglyphic test footage – 2 Canon 7Ds on a side-by-side rig

As I’ve mentioned, we’re testing several camera systems out to decide what to use to film our first 3D documentary. We’ve seen promising footage out of our A cam system – an Iconix sensor system with Meuser Optik lenses on a side-by-side rig.

Now our stereographer, Sean White, has brought in B roll he shot with our C cam system: two Canon 7D DSLRs on a side-by-side rig.

Happy to say it’s not looking bad either.

Need a pair of the old school anaglyphic glasses for this one:

There’s only one problem: some of the backgrounds are diverging past our broadcasters’ specs.

So now we’ll have to experiment with different interaxials until we fix the issue.

In the field – the demo of a condemned sports stadium in Salvador, Brazil for the explosive demolition series Blowdown – this system will be used to capture establishing shots of the structure and, of course, its implosion.

Here’s an earlier video of Sean, walking though the setup.

We’re also honing how to capture our time lapses with this system – details to come.

Video: testing lenses for 3D HD filmmaking – how to tell which ones stack up

The great lens showdown is over: Meuser Optiks it is. After an intense push to 
After an intense push to choose lenses for our A cam system so we can shoot our first 3D documentary, these German lenses – 3.4 mm, designed for a 1/3-inch CCD sensor, and HD capable – were the ones that made the cut.

They work with our Iconix 1/3-inch sensors, and the interaxial distance can be set close enough to allow us to fil  1 ½ -2 metres away from our subject.

The Schneider Cinegon 5.3 mm lense and the Fujinon 4.8 mm HD Prime lens just didn’t work as well for us.

Here’s video of the test screen – our stereographer, Sean White, explains what we’re looking for while we’re watching the test footage on our new JVC 3D HD monitor

Another to follow ASAP on why the system should work to shoot the prep and implosion of a condemned sports stadium in Salvador, Brazil for the explosive demolition series Blowdown – YouTube’s fighting me.

Next!

Shooting a 3D documentary: Film Factory 3D Indie BS Rig mirror issues

So … we’ve broken the backup mirror we purchased for our Film Factory 3D Indie BS Rig to shoot our first 3D documentary.

This wouldn’t be a huge problem if the stock mirror that came with the rig were up to QC par.

But it isn’t – which is why we were using the backup in the first place.

Here’s the issue: one side of the stock mirror is coated and one side isn’t – the coated side is reflected to the camera that’s mounted on the top of the rig.

This disparity seems to cause a difference in light between the two cameras, to the order of one stop (ie. the upper camera gets about half the amount of light as the horizontal camera).

Our stereographer, Sean White, also found that there’s a slight colour difference between the two cameras, and a mild fogginess to the stock mirror.

We plan to use this rig to shoot the implosion of a condemned sports stadium in HD. And we deal with high-profile broadcasters – we have to deliver high-quality footage (for them and, more importantly, for a worldwide audience).

So Sean grabbed the spare – which we bought in case we break the original one while filming on an industrial site in Salvador, Brazil for the explosive demolition series Blowdown – to see if it gave us more consistent picture.

It did – there’s only 1/3 to 2/3 of a stop difference between the two cameras, the colour is almost matching, and it’s fog-free.

Though none of us are sure why this is the case, we moved to film with the superior mirror (ie. the backup became the starter).

But while Sean was re-screwing it into the rig, it cracked.

The placement process is quite a balancing act – screw the mirror in too loosely (or mess up the gaffer tape), and it threatens to slide out the bottom when you position it at 45 degree angle.

Sean thought he had found the sweet spot for tightening, but he was used to adjusting the stock mirror … the backup shattered under a similar amount of tension (which makes us think the first mirror may contain more plastic, but that’s just a theory).

Needless to say the setback is disappointing.

Sean got in touch with 3D Film Factory. They won’t exchange the stock mirror for one that’s like the backup. But they will sell us another backup at a deep discount.

Granted, this rig is cheaper than most of the other ones out there, so we can’t expect the moon.

But considering how integral a working mirror is to the system, hopefully quality discrepancies and the finicky screw-in process will be rectified in the future.

Shooting a 3D documentary: building a mini beam splitter rig for close ups

Vision alert. So we’re thinking of designing our own mini beam splitter rig to shoot close ups for our first 3D documentary . Here’s why: as I’ve mentioned,we’re trying to sort out our B cam system using Film Factory’s 3D Indie BS Rig – this should hopefully work for the majority of our B cam shots.

But it isn’t the most portable system – something that will surely prove challenging on an industrial site, where the explosive demolition series Blowdown takes place.

For the odd close up of the crew loading explosives etc. in a condemned sports stadium in Salvador, Brazil, it’s painful to think about moving the whole rig and setting up just to get a shot or two.

And we’d like to avoid using a side-by-side rig  because it’s a mission (if not a mission impossible) to get the cameras close enough together to film these types of shots.

If there’s a way to build a mini beam splitter unit, one person could just move in and get this footage with way less trouble (ie. instead of two people to set up the full-sized rig, etc.).

As an added bonus, we could also use this system in a temporary pinch if the main B cam system happened to go down.

We bought an extra mirror anyway, in case the one that came with the Film Factory Indie rig system malfunctions mid-shoot … why not try and put it to use?

Our stereographer, Sean White, knows a machinist who may be able to help us build this mini rig we’ve envisioned.

We’d probably use Canon Vixias – smaller than the Sony EX1/EX3 combination we’re trying to make work with the Film Factory Indie rig – and rig it as an underslung system.

One camera would be positioned below (instead of above), and the spare mirror would be angled the opposite way as the one on the full-fledged beam splitter rig.

This rig would theoretically snap onto a tripod, and would achieve a small enough interaxial distance for us to get the close-ups we need without a mega hassle.

If any stereo, etc. issues arose, we’d correct them in post – theoretically a relatively small workload considering we don’t use tons of these types of shots in our shows.

At the moment, it’s just an idea – but seems fittingly par for this unchartered course.

3D beam splitter rigs for Sony EXs: filmmakers weigh in

It seems we’re not alone in the quest to find a beam splitter rig/camera system that will work as our B cam setup for shooting our first 3D documentary.

My previous blog outlining the issue has been posted on the Yahoo! Group thread P+S Technik 3D Stereo Rig + 2 Sony EX3, where there are entries from several people looking for information on how to make this – and similar systems – work for them.

Here’s our particular issue: we’ve been testing a Sony EX1 and a Sony EX3 mounted on a Film Factory 3D Indie BS Rig, but are having issues getting the cameras optimally positioned.

One alternative mentioned in the Yahoo! thread is a P+S Technik rig, but from what I gather it’s more expensive than the Film Factory Indie unit we’ve purchased.

Another up-and-coming alternative seems to be Alister Chapman’s “Hurricane” beam splitter rig, evidently designed specifically with Sony EX3s in mind.

(more…)

3D documentary filmmaking: how to sync two Canon Vixias with one remote

As mentioned, I selected implosion cams for our first 3D documentary – six (three pairs) of Canon Vixia HF 10s and 12 (six pairs) of Canon Vixia HF M31s – a little while back.

Next, we needed to figure out how to turn each pair on simultaneously (the duos will be positioned to capture the implosion of a condemned sports stadium in Brazil for the explosive demolition series Blowdown).

And how to turn them on without knocking one (or both) out of alignment.

The cameras need to sit at a 74 mm interaxial distance, right next to each other, for us to capture the footage we need.

This means they’ll be positioned too close together for use to easily access the viewfinder on the right camera, where the camera controls are.

Since each camera comes with a remote, we tried to use them to adjust the settings on each one (holding two, trying to point each one at the infrared sensor on its respective camera), but it’s cumbersome and awkward.

It’s a problem: we need four elements to be in sync between before we start recording for these shots to work: the two cameras have to have the same zoom, the same white balance, the same exposure, and the same focus.

The risk of losing one or more implosion shots – our big bang footage that climaxes the show – because the crew’s running around like mad, trying to calibrate and turn these 18 cameras on properly while preserving their alignment, is a risk I’m not willing to take.

So our stereographer Sean White discovered a work-around – a home-made infrared transmission system that allows us to control both cameras at the same time.

With sourced components off the Internet, a box has been built that will receive any infrared signal and transmit it through a split cable to two infrared sensors.

(more…)